What is Physical Minecraft❓
Physical Minecraft is a project that I made. It brings a "phyiscal" aspect to playing Minecraft. With Physical Minecraft, you can interact with Minecraft using physical blocks and a physical wand.
 |
| Making Physical Minecraft was a great educational experience for me and it is very fun to use! |
What you need to build this

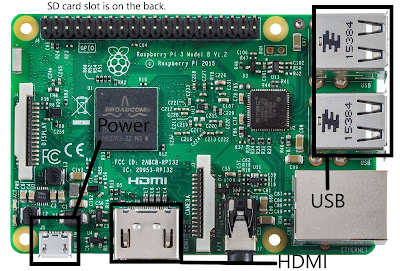
1. Raspberry Pi 3-The Rasberry Pi runs Minecraft Pi. It also receives motion data from the wand. Do not use an earlier version of the Pi as it will not have Bluetooth functionality.
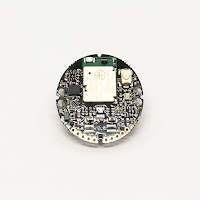
2.MetaWear C-The MetaWear is a sensor board with
Bluetooth Low Energy. It is used inside of the wand.
3. The Wand- Is used to interface with Minecraft. It contains the MetaWear sensor. It is 3D printed. You will
also need two #4 screws, four #4 nuts, some tape, and a small neodymium magnet. You can design your own or use mine.
4.A hollow box, at least 9*12*5 inches.
5.20 DuPont Female to Female wires.
6.Monitor with HDMI input, and an HDMI cable.
7.Mouse and keyboard that will connect to the Rasberry Pi.
8.7 1*1*1 cubes. I found wooden ones at a craft store but here is a link for 3D printing.
9.The templates for the blocks. Follow the link for some samples, which I designed and used to build this.
10.Printable template for the top of the box.
11. A 16 GB microSD card.
12.7 reed switches
Please comment if you think something is missing.
Now let's make a program together that will make a little tent in Minecraft. You will need to open a Python editor on your Pi.
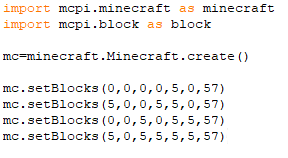
First, we should import the Minecraft packages and initialize the world.
Next, let's create four legs for our tent by using the setBlocks command:
3. Type in scan on then press Enter.
4. You should see a bunch of names(including MetaWear) and a corresponding MAC(Media Access Control) address. Find the MAC address for the MetaWear.
5.Type in pair(MAC address) and press Enter.
6. Your Pi is connected to the MetaWear!
7.Type in disconnect(MAC address) to disconnect from the MetaWear when you are done using it.
also need two #4 screws, four #4 nuts, some tape, and a small neodymium magnet. You can design your own or use mine.
4.A hollow box, at least 9*12*5 inches.
5.20 DuPont Female to Female wires.
6.Monitor with HDMI input, and an HDMI cable.
7.Mouse and keyboard that will connect to the Rasberry Pi.
8.7 1*1*1 cubes. I found wooden ones at a craft store but here is a link for 3D printing.
9.The templates for the blocks. Follow the link for some samples, which I designed and used to build this.
10.Printable template for the top of the box.
11. A 16 GB microSD card.
12.7 reed switches
Please comment if you think something is missing.
Setting the Raspberry Pi up!
Okay, now that we got our stuff, let's get to work!
1. First, let's set up the Raspberry Pi.
a. Go here and click on Download ZIP for Raspbian Stretch for Desktop.
b. Unzip the file, by using an unzipper you already have or using 7zip for Windows or The Unarchiver for Mac.
c. Get the SD Formatter and follow the instructions to install the software.
d. Connect your microSD card to the computer. (You might need an adapter.)
e.In SD Formatter, select your SD card and format it.
f.Go to the Downloads folder of your computer and unzip(extract) the file, and keep the resulting window open.
g.Transfer the unzipped file to the SD card.
h.Eject the SD card.
i. Put the SD card in the Pi, and then connect the Pi's HDMI to the monitor, and USB to a mouse and keyboard. Then power it up using the microUSB.
j.The Pi will show a loading screen, then a setup wizard will open. Follow the instructions. Then you are done setting up your Pi!
 |
The Minecraft side of things
Raspbian comes with Minecraft Pi pre-installed on it. Minecraft Pi is a stripped-down version of Minecraft PC which can be controlled by code in the Python language.
First of all, we will import mcpi.minecraft and mcpi.block, as minecraft and block, respectively.
Next, we have to initialize the minecraft world, by doing
mc=minecraft.Minecraft.create().
mc=minecraft.Minecraft.create().
In Minecraft there is an ID for every block. For example, AIR=0,OBSIDIAN=49, and DIAMOND_BLOCK=57. Here is Minecraft's coordinate system. We will be using it a lot throughout this.
Now let's look at some common commands.
Now let's look at some common commands.
mc.setBlock(x,y,z,ID)
Sets a specific type of block at the given coordinates.
mc.setBlocks(x1,y1,z1,x,y2,z2,ID)
Sets a cuboid of blocks all at once,filling the gaps between the 1 values and 2 values.
mc.postToChat("message")
Posts a message to the game chat.
mc.player.getPos()
Gives the player's position in (x,y,z), if the player is in the middle of the block, value.5 is returned.
mc.player.setPos(x,y,z)
Teleports the player to the given coordinates.
References:
Now let's make a program together that will make a little tent in Minecraft. You will need to open a Python editor on your Pi.
First, we should import the Minecraft packages and initialize the world.
This creates four 5 block tall poles in a square shape that are made out of diamonds. Experiment with the code to make something you like.Now we have to build a roof.
Now open up a Minecraft window and create a world. After that, press F5 to run the program and then go to the Minecraft world. You should see your structure. If you don't, it might be somewhere else, you will have to go and find it.
You can use mc.player.getPos() to ensure the tent will spawn close to you.
The MetaWear side of things
Get out your MetaWear sensor board. The MetaWear has a 3 axis accelerometer, temperature sensor, and 3 axis gyroscope. In this section we will be reading sensor values from the MetaWear board.
1. Insert the CR2032 coin cell battery into the MetaWear, in the correct orientation. A light should light up on the MetaWear.
2. Open up Command Prompt on the Raspberry Pi and type in bluetoothctl, then press Enter.3. Type in scan on then press Enter.
4. You should see a bunch of names(including MetaWear) and a corresponding MAC(Media Access Control) address. Find the MAC address for the MetaWear.
5.Type in pair(MAC address) and press Enter.
6. Your Pi is connected to the MetaWear!
7.Type in disconnect(MAC address) to disconnect from the MetaWear when you are done using it.
The Blocks
This is a picture of reed switches taped to the back of the box. On the opposite side, there is a block with a magnet.
Above is a diagram showing the layout. The magnet is inside of the block. The reed switches are connected to the Raspberry Pi's GPIO(General Purpose Input/Output). I used the RPi.GPIO library to find the inputs from the reed switches. They are connected to pins 2,3,4,5,6,13, and 19 of the Pi's GPIO.
The Code
pm-mcpi-thread is the version of the code I used at the NOVA Maker Faire. pm-mcpi and pm-mcpi-move were earlier versions of the code.
Explanations of how some of it works and some details-
1. The Raspberry Pi gets data from the MetaWear through MetaWearClient, which is from pymetawear.client.Data is stored in a ring buffer which holds the last 20 values.
2. In the pinouts of the blocks, you do not have to use pins 2,3,4,5,6,13 and 19 but you can map your own as long as they are valid pins and you edit the GPIO code for the right pins.
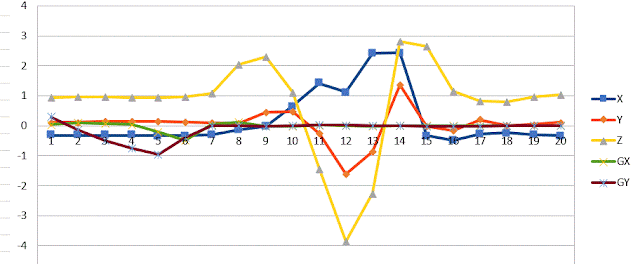
3. How I make gestures is a very complicated process. First I have to make a gesture, for example, left-down-twist-right. Next, while holding the wand, I run gesturic.py and perform my gesture. I will get a lot of data on the command line. I copy paste that data onto a spreadsheet. Then I graph all the data and I will see a lot of peaks and dips if it is a good gesture.Here is a sample graph.
X, Y, and Z all show significant ups and downs. Next, I turned the x, and z values to a 0,1, or 2. For example,[0,0,0,0,1,2,0,-1,-1,-1,1,1,2,0,-1,-1,0,2,1,0].You can see the code for how I integrated it into the program.
4. All of the packages that are used in the program might not be in the Pi, so you can use pip
install on the command line to install them.
4. All of the packages that are used in the program might not be in the Pi, so you can use pip
install on the command line to install them.
Have fun with the finished product❗


 13. A micro USB power supply.


Great website!
ReplyDeleteyep
Delete